
KPIs for Realtime Video Analytics:
- The minimum, maximum, and average processing time per frame. We require that the average processing time should be in the order of few ms per frame, given a good and powerful enough GPU to perform the detection process.
- The image quality of the cropped detected objects should be as good as the resolution of the input video.
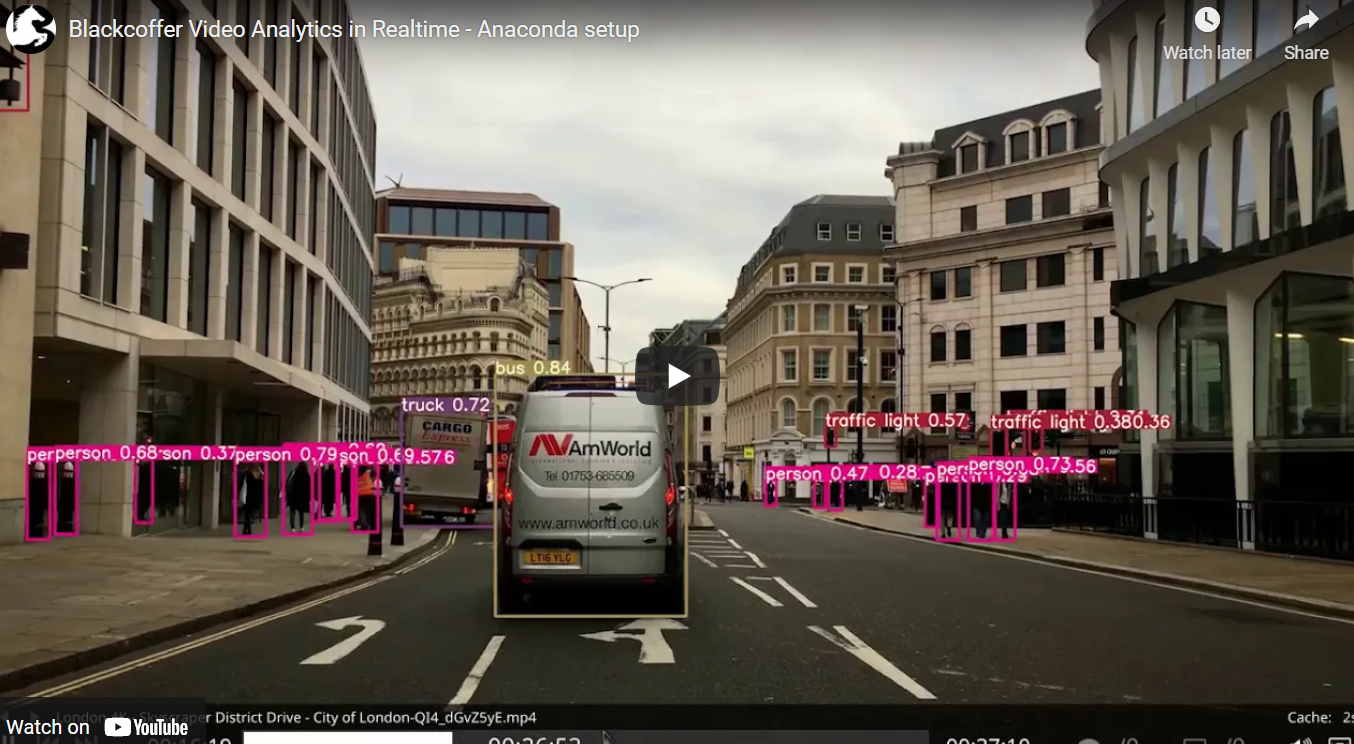
For a sample video, we recommend the following video from YouTube. We use it in our tests. It is available in HD and also 4K.
What we need exactly is the following:
- Detect and extract all possible objects (Persons, Cars, Traffic lights, Buildings, …etc) in the video frames.
- Crop and Save the extracted objects into the local disk as images of good quality.
- The time processing should be less than 30ms per frame.
- Re-stream the original video with objects highlighted in frames (You can find here in the second video an example of the output we want to achieve).
- Preferred programming language: Python or C++ (the latter is expected to provide faster results)
To be more precise, our actual need is to process a live 4K video at 60fps in real time. This means we need to treat each frame in ~ 10ms (the rest 5ms will be used to do certain actions once the detection is done on a specific frame).
Results for Realtime Video Analytics
Use case
- Perform object detection on every frame of 4k video in few millisecond timeframes.
- Crop and save detected objects from every frame.
- Save video after performing object detection.
The language used- python
Algorithms for object detection
There are multiple algorithms that can be used for object detection. This includes, but not limited to, R-CNN, Fast R-CNN, Faster R-CNN, SSD, YOLO, etc. including their multiple variants (Here’s a list of many of them- https://github.com/amusi/awesome-object-detection). Our use case requires us to have very fast algorithm capable of detecting objects in real-time. Depending on input both SSD and YOLO perform very well and can be used. Here, we are using pre-trained models based on YOLOv5 (https://github.com/ultralytics/yolov5).
The algorithm used for Realtime Video Analytics
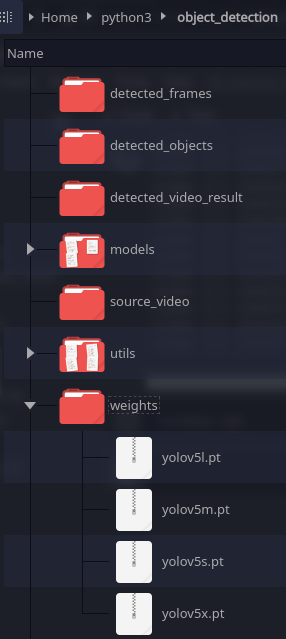
We have used YOLOv5 for detecting objects as it performs well in real-time. It includes multiple pre-trained models. Pre-trained models available-
These models are saved inside “weights” directory.

How it works
The frames from the video are first converted into an array and then object detection is performed based on the smaller size of the original image (since we need high performance) using any of the given pre-trained models/checkpoints.
The bounding boxes are generated (which encloses the detected objects) and then data (pixels) inside the boxes for every object of every frame are stored as images inside a directory “detected_objects”. Similarly, frames are stored inside the “detected_frames” folder.
Meanwhile, video output is also generated at the end which is the original video but with detection boxes and objects labeled along with a percentage on how likely the detected object is likely to be correct from the data in the model. Output is stored in the “detected_video_result” directory.
The table below gives a rough idea of how the speed of pre-trained models on a dataset with the same size differs. GPU in the table below is Nvidia Tesla V100 (comes with the paid version of Google Colab, i.e., Colab Pro). For our need, we can take any of these models-

Models are based on COCO dataset.
Graph below gives a general idea on how pre trained models perform-
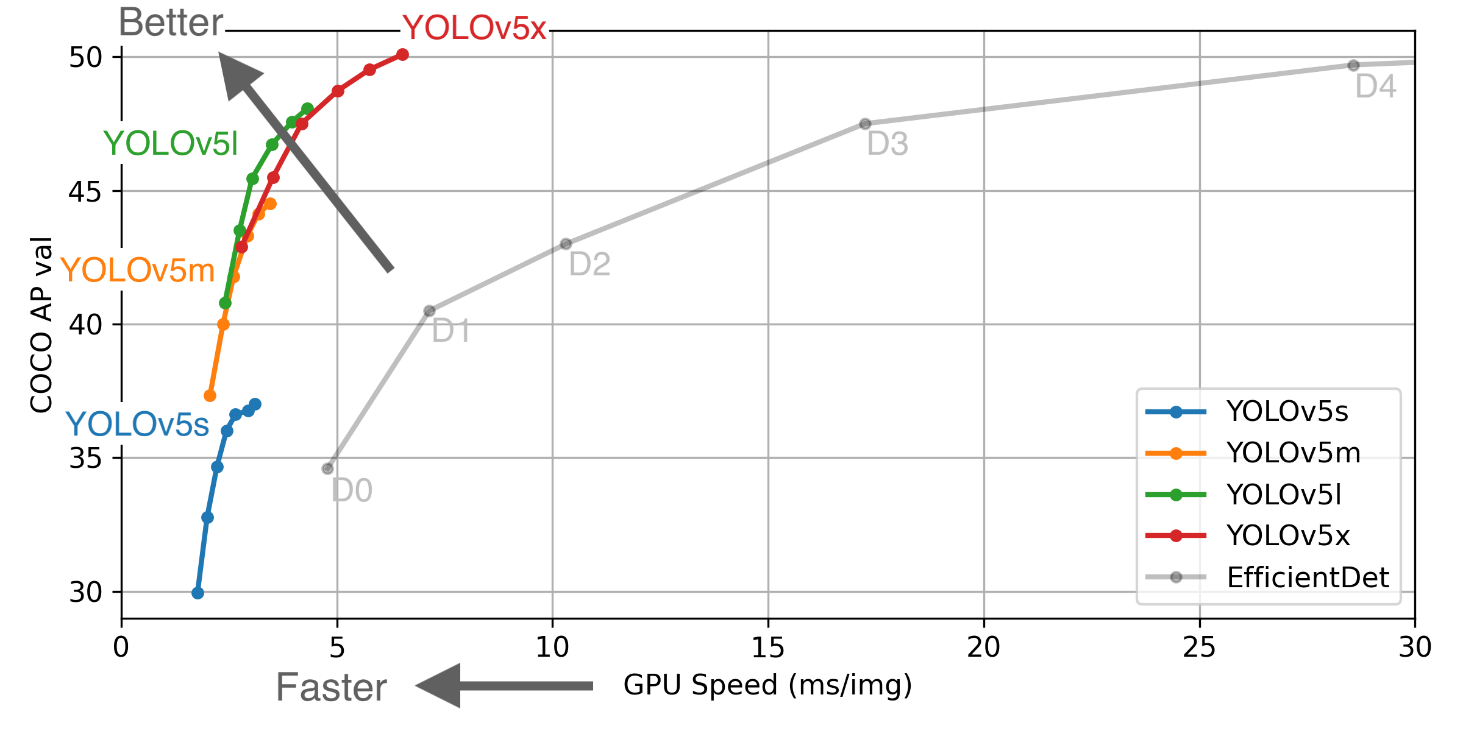
(Source- https://github.com/ultralytics/yolov5)
Testing and Result
Here, google collab’s free session GPU Nvidia Telsa P100 (16GB VRAM) was used.

RAM and GPU VRAM usage while running the code for 4k video source:

During the testing of the smallest model (yolov5s) on a 4k model with default parameters, results are as shown-
Output frame for Real-time Video Analytics :

frames directory:

The output of individual objects:


individual objects inside directory- Output :

The final video is saved inside the “detected_video_result” folder.
Note: Saving these output images will take a huge amount of disk space. If these images are not needed, respective folders (“detected_frames” or/and “detected_objects”) can be deleted. The final output video will also take a large amount of disk space.
Average time, minimum time, and maximum time while processing one frame on sample video (in seconds) (Source video – https://www.youtube.com/watch?v=QI4_dGvZ5yE):


It is significantly slower than colab pro’s (paid) gpu. Data can be processed much faster using paid (colab pro’s) gpu or any other better workstation card. Comparisions of Nvidia Telsa P100 with Nvidia Telsa V100- https://www.e2enetworks.com/tesla-v100-vs-tesla-p100-key-differences.
Final output using “https://www.youtube.com/watch?v=QI4_dGvZ5yE” as a source-
Limitations for Realtime Video Analytics :
- Image processing time and time is taken to run the code will depend on gpu used. Paid high-end workstation cards would perform the best.
- There is always latency involved when writing images and video to disk. It can be reduced by using an SSD but cannot be removed completely.
- Since the images and video files stored are uncompressed, they take a huge amount of space in the disk (video file goes from 3GB source to 15GB result video).
- The resolution of images will depend on how many pixels that object takes inside its frame.
- Tutorial/Usage
There are two ways to run the program, either google colab (with gpu) (or any other cloud service which provides gpu, like kaggle) or natively on the machine using inside an anaconda environment.
Python 3.8 is required.
For google colab, whole folder can be transferred to google drive and then open “Tutorial.ipynb” with colab and follow steps as given in file.
For an anaconda environment, first, install anaconda. Then open directory with anaconda prompt/terminal and run-
pip install -r requirements.txt
Then add a source video inside the “source_video” directory, then run the following code inside the terminal-
python detect.py –weights “weights/yolov5x.pt” –img 640 –conf 0.25 –source “source_video/video.mp4”
where “video.mp4” is the video that needs to be processed.
Here parameters can be changed as needed,
- Use the’–weights’ parameter to match the model needed. All models available inside the “weights” folder. The bigger the pre-trained model used, the longer it will take to process each frame.
- Change value of ‘–img’ parameter change input inference pixels. Higher value might improve detections but will also increase the processing time of every frame.
- ‘–conf’ parameter can be used to set the minimum probability of an object that should meet the specified value in order to be acknowledged. Here, default value ‘0.25’ means detections will only be made when the model is at least 25% sure that the detected object is correct.
If needed, code can be modified from “detect.py” file.
https://drive.google.com/drive/folders/12LMjLZFFi12TvOPU54atFTbJQnuyy1PN?usp=sharing
https://drive.google.com/drive/folders/18DXKJLLuWXaR2Puv4a18H5-8Dx7k50jZ?usp=sharing
https://drive.google.com/file/d/1tSxMlhk2wDmXuDRPwO4LtFjaqhv14_uB/view?usp=sharing


 Data Warehouse")


