


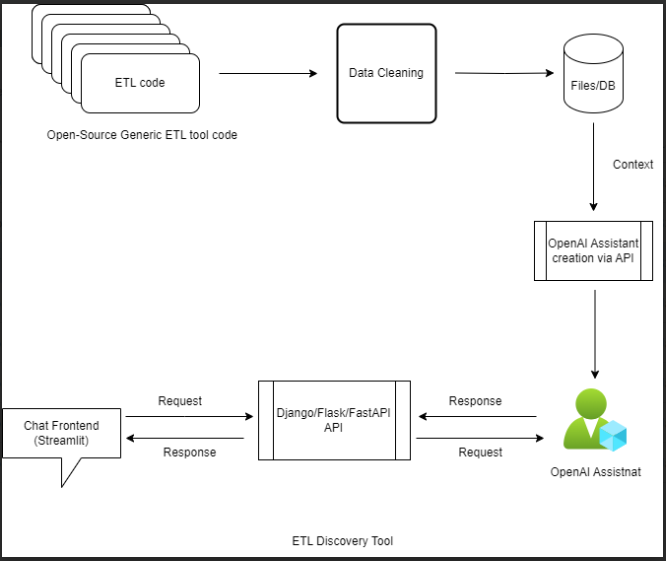
Figure: Workflow
Step by Step Execution
Step 1. Open-Source Generic ETL Tool Code:
The Open-Source Generic ETL Tool serves as the core engine for Extract, Transform, and Load (ETL) operations. It is designed to handle data extraction, transformation, and loading tasks efficiently. It will be used for training the OpenAI model on the ETL Discovery tools.
Step 2. Data Cleaning:
Data Cleaning is a critical stage that involves cleansing and preprocessing raw data to enhance its quality and integrity. In this step the ETL understands the expected data format that is organized and cleaned for uniformity of data.
Step 3. Files/DB
Represents the storage or databases utilized for storing processed data. In this step, solutions for processed data the code files will be arranged and catalogued so that they are ready to be used by the OpenAI Assistants API.
Step 4. OpenAI Assistant Creation via API:
This step involves creating an OpenAI Assistant using the OpenAI API.
- Configuring the OpenAI Assistant
- Configure .env file with OpenAI API Key
- We will upload the files to the Assistant for it to be added in context.
- Run assistant creator.py file for generating OpenAI Assistant ID
- After Generating OpenAI Assistant id look into terminal save the generated ID into .env file
- We will get the assistant ID that is to be used later.
Step 5. OpenAI Assistant:
In this step, the Assistant that is created from previous step will be queried by the API with instructions for the context accommodation.
- Features and Capabilities: functionalities supported by the assistant
- OpenAI Assistant will read all our ETL pipeline which is provided when we are generating the OpenAI assistant ID
- Usage Guidelines/Instructions: – Guide users on interacting with the OpenAI Assistant
- We are providing Instructions to our OpenAI Assistant to communicate with user
Step 6. Django/Flask/FastAPI API:
This step involves setting up an API using popular frameworks like Django, Flask, or FastAPI.
- Framework Selection: choice of the specific framework
- We are using Flask API to communicate with the OpenAI Assistant
- API Endpoints: available endpoints and their functionalities
- Configured the OpenAI Key in app1.py
- Configured the OpenAI Assistant ID in app1.py
- Store the Instruction file into variable we are using the variable below
- After the Configuration of Flask file run the app1.py file to start the Flask API Local Server
- Authentication: – Used for securing the API
- Handling Request and Response process
Step 7. Chat Frontend (Streamlit):
Represents the user interface for interacting with the system, built using Streamlit.
- Configurations: Configurations of Streamlit frontend
- Set your OpenAI API key into .env file
- User Interaction: Users will be able to query based on training data.
- Integration with Backend: – Frontend will be connect to the backend API.
- In the main.py file Provide the Flask API url endpoint to communicate with OpenAI Assistant
- Handle Request and Response from the User
Step 8. File Description
assistant_creator.py
Provided Python script uses the OpenAI API to create an OpenAI assistant. The OpenAI assistant is trained on various ETL-related files, such as Jupyter notebooks and Python scripts, which are uploaded using the OpenAI API to create OpenAI Assistant ID. The files are associated with the assistant to enhance its understanding of ETL concepts and workflows.
- Import Libraries:
- In this step we are imports necessary libraries, including OpenAI for interacting with the OpenAI.
- In this step API and dotenv for loading environment variables from a file.
- Load API Key:
- In this step loading the OpenAI API key from the environment variables.
- In this step Defining client from OpenAI
- Assistant Creation Function
- In this step the assistant_creator function is defined to create an OpenAI assistant.
- File Uploads:
- In this step inside the assistant_creator function uploads multiple ETL Pipelines files, including Jupyter notebooks and Python scripts, using the OpenAI API’s files. These files are associated with the assistant to train it on various aspects of ETL workflows.
- Assistant Creation:
- In this step the assistant_creator function then creates an OpenAI assistant using the uploaded files. -The assistant is given a name, description, and associated with a specific GPT model. It is configured to use a retrieval tool.
- Return Assistant ID:
- In this step the function returns the ID of the created assistant.
- Print Assistant ID:
- In this step the function prints the ID of the created OpenAI Assistant in the Terminal.
- In this step saving the printed Assistant ID in .env file. We will use the Assistant id in the Flask API
app1.py
This Python script creates a Flask API that serves as an interface for interacting with an OpenAI model assistant. The OpenAI assistant is designed to respond to user input and provide relevant information based on ETL pipelines workflows.
Here’s a step-by-step description of app1.py:
- Import Libraries:
- Load Environment Variables:
- In this step loads the OpenAI API key and existing OpenAI assistant ID from environment variables.
- File Operations Functions:
- In this step we defines two functions (copy_text and remove_references) for file operations and text manipulation.
- In this step copy_text reads the content of a file.
- In this step remove_references uses regular expressions to remove specific patterns from text.
- In this step we defines two functions (copy_text and remove_references) for file operations and text manipulation.
- OpenAI Client Initialization:
- In this step initializes the OpenAI client using the API key.
- OpenAI Assistant Setup:
- In this step using the existing assistant ID from assistant id which we have already get from environment variable.
- In this step created an empty dictionary to keep track of user conversations.
- In this step using copy_text function we are passing our instruction file and store into variable.
- Flask App Initialization:
- In this step the Flask API is initialized, and is enabled to handle requests and response.
- Chat Endpoint function:
- In this step the chat endpoint function is defined to handle POST requests. It receives user input and user token from the request in JSON format.
- Thread and Message Handling:
- In this step in this step this python file manage user threads using the OpenAI API’s threads and messages functionality. It creates a new thread if the user token is not present, and then adds the user’s message to the thread.
- Assistant Interaction:
- In this step it uses the OpenAI API to create a new run, associating it with the existing assistant ID. The conversation history and instructions are updated based on the user input.
- Return Response:
- In this step the response from the OpenAI Assistant model is extracted. The final response is sent back as a JSON object.
- Run the flask app main function
Main.py
This Python script integrated the Streamlit front-end to create a user interface for an ETL Discovery Tool and integrating OpenAI for conversational interactions.
Here’s a concise step-by-step description:
- Import Libraries:
- Environment Initialization:
- In this step Checking for the existing of the OpenAI API key in the environment variables.
- Page configuration:
- sets the page title and icon
- Backend Communication Function:
- In this step defines a function to communicate with a custom backend API, sending user input and receiving responses.
- Streamlit UI Setup:
- In this step it sets up the Streamlit UI, including the page header and a chat input box for users to interact.
- User Input Handling:
- In this step we are handling the user input and appends it to the message history.
- Interaction with OpenAI Assistant:
- In this step sending user input to the OpenAI Assistant model for processing and appends the model’s response to the message history.
- Display Message History:
- In this step displaying the message history, containing both user and OpenAI messages, is displayed in the Streamlit app.
- Run main function
Step 9. How to set up and run
- Clone the Repository/ download the file
- UNZIP the sources or clone the private repository. After getting the code, open the file in the vs code, take new terminal and navigate to the working directory.
- Setup Environment
Virtualenv modules installation (Windows based systems)
- Python –m venv .venv- Name your venv according to you
- .venv\Scripts\activate- for activating the env
- Install the Required Application
- pip install -r requirements.txt
- Create .env file for storing the OpenAI API key
Run
-Run assistant_creator.py file
- Python assistant_creator.py
– Run app1.py file
- Python app1.py
– Run main.py file
- Streamlit run main.py
Summarize
Summarized: https://blackcoffer.com/
This project was done by the Blackcoffer Team, a Global IT Consulting firm.
Contact Details
This solution was designed and developed by Blackcoffer Team
Here are my contact details:
Firm Name: Blackcoffer Pvt. Ltd.
Firm Website: www.blackcoffer.com
Firm Address: 4/2, E-Extension, Shaym Vihar Phase 1, New Delhi 110043
Email: ajay@blackcoffer.com
Skype: asbidyarthy
WhatsApp: +91 9717367468
Telegram: @asbidyarthy